
Connecting TaxCloud to QuickBooks Online
Connect QuickBooks Online with TaxCloud to automatically calculate and apply sales tax to your invoices, sales receipts, and estimates, and to simplify your filing process for sales collected in each taxing jurisdiction.
:::info Read How the QuickBooks Online Integration Works first to understand which document types are supported, how tax calculations are triggered, and rules to keep your records accurate. :::
Before You Begin
Before starting setup, confirm the following:
-
You must be on the TaxCloud Premium plan to use this integration.
-
Your TaxCloud account must be configured to collect taxes in state(s) where you invoice customers.
-
You have admin permissions in QuickBooks Online.
-
Your QuickBooks Online company address is set to a valid address. This is required to enable tax calculation.
-
If you previously used a different sales tax integration like Automated Sales Tax (AST) with QuickBooks Online, disable and uninstall it before proceeding. Make sure there is no conflicting sales tax product or sales tax payable account remaining.
-
You are using QuickBooks Online in a web browser. The browser extension is compatible with Google Chrome and Microsoft Edge. Other browsers that support Chrome extensions may also work.
-
This integration works with all QuickBooks Online editions — Simple Start, Essentials, Plus, and Advanced. Your QBO plan doesn't affect compatibility.
-
The installable QuickBooks Online app for Windows and macOS is not supported. QuickBooks Desktop is supported through a separate integration — see TaxCloud for QuickBooks Desktop.
Step 1: Determine Your Product Tax Codes (TICs)
TaxCloud uses Taxability Information Codes (TICs) to calculate the correct tax rate for each product or service you sell.
Review the list of TaxCloud TICs to find the codes that apply to your goods and services.
-
If all your products fall under a single TIC, you can set this up yourself.
-
If you sell products across multiple TIC categories, review the article below on how to set Tax Codes (TICs) for each specific product—this is what tells our system what your product is, and therefore what special tax rules apply.
:::info See also: Setting Up Product Tax Codes (TICs) for QuickBooks Online :::
Step 2: Set Up QuickBooks Online Automated Sales Tax (AST)
If you are not already using Automated Sales Tax (AST) by QuickBooks Online, follow Intuit's instructions to set it up now.
Preparing QuickBooks Online for a Tax Integration 684x408
Enable the Sales Tax Center (initial AST setup)
Use these steps if you’re entering the Sales Tax area for the first time and QuickBooks prompts you to complete the initial setup wizard.
-
In QuickBooks Online, navigate to the Sales Tax section.
- Depending on your QuickBooks UI, this may appear as Taxes > Sales Tax or My apps > Sales Tax.
-
On the setup screen, click Get started.
-
Verify your business address, then click Next.
- If the address is incorrect, click the pencil icon next to the address to update it before proceeding.
-
Select/apply a tax agency, then continue.
-
Review the rates shown and click Save to finish.
:::tip It does not matter what selections you make during AST setup—you will override these settings in the next step. In particular, if QuickBooks requires you to choose an agency to complete initial setup, any agency is fine for the purpose of enabling the sales tax center. :::
Troubleshooting
- The setup wizard doesn’t appear: Automated Sales Tax may already be enabled/configured. Continue to the next step to override AST for use with TaxCloud.
Step 3: Override QuickBooks Online AST
To avoid double taxation and calculation conflicts with TaxCloud (or another third-party tax calculation service), adjust QuickBooks Online's AST settings before activating TaxCloud.
-
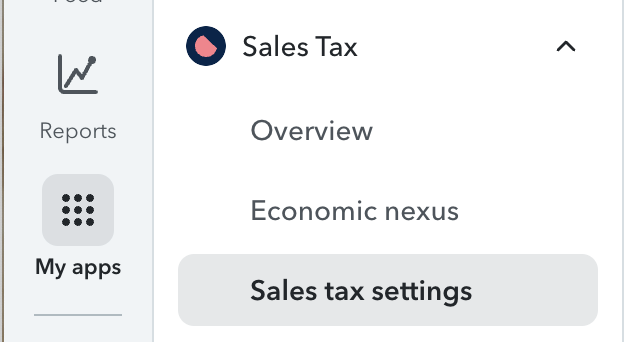
Navigate to the Sales Tax Settings page.
-
New UI: Go to My apps > Sales Tax > Sales tax settings.
-
Alternate navigation (some accounts): Go to All apps > Tax settings > Sales Tax.
-
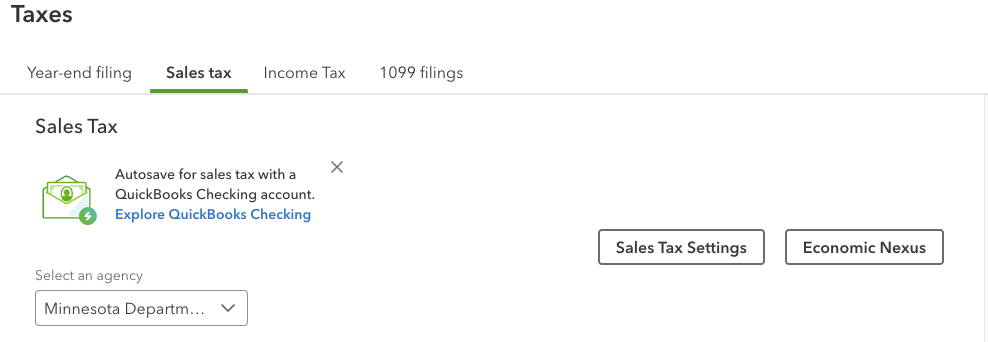
Legacy UI: Go to Taxes > Sales Tax, then click Sales Tax Settings.
-
-
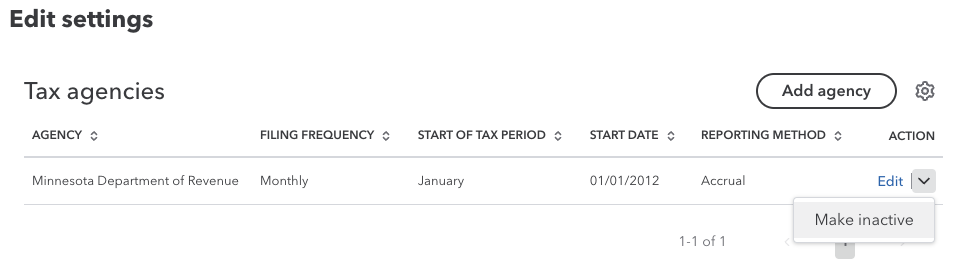
Disable each tax agency by clicking Edit > Make inactive. If that option is not available, click Edit and set the Start date to 1/1/2099.
-
(Recommended) Under Custom rates, make any existing custom rates inactive (Edit > Make inactive) to avoid conflicts with third-party tax calculations.
-
Add a custom 0% TaxCloud tax rate to prevent double taxation. You will apply this rate to every invoice, sales receipt, and estimate.
- Under Custom rates, click Add rate / Add custom rate.
- If prompted, select Single for the custom rate type.
- Set the Name to
TaxCloud(or a name that clearly indicates this is your TaxCloud placeholder rate). - Select any Agency.
- Set the Rate to
0.00. - Click Save.
:::info Why a 0% rate? The 0% rate acts as a placeholder (an “insurance policy”) so QuickBooks Online does not add its own sales tax on top of what TaxCloud calculates.
If you can’t save the 0% custom rate, make sure you selected an Agency from the dropdown. QuickBooks requires an agency selection even when the rate is 0%. :::
:::tip If you accidentally disable the wrong agency or rate, you can typically view inactive agencies/rates and reactivate them from the same Sales Tax settings area. :::
Step 4: Connect TaxCloud to QuickBooks Online
-
In TaxCloud, go to the Integrations page.
-
Click Add Connection, then select QuickBooks Online.
-
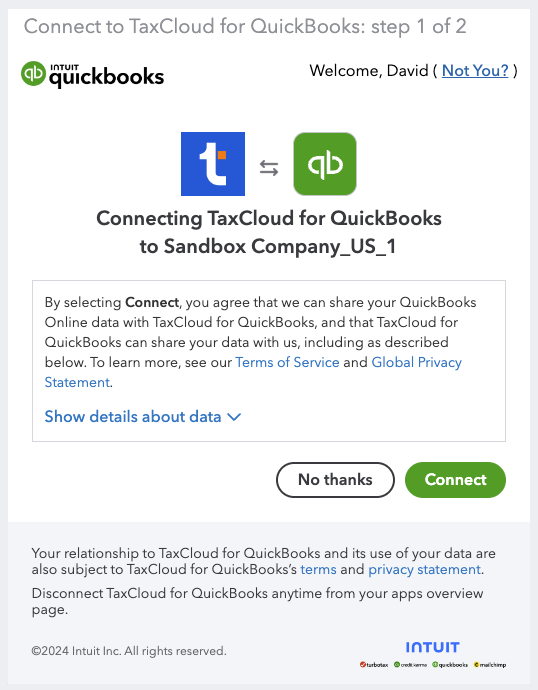
In the top-right corner, click Connect.

-
If prompted, sign in to your QuickBooks Online account.
-
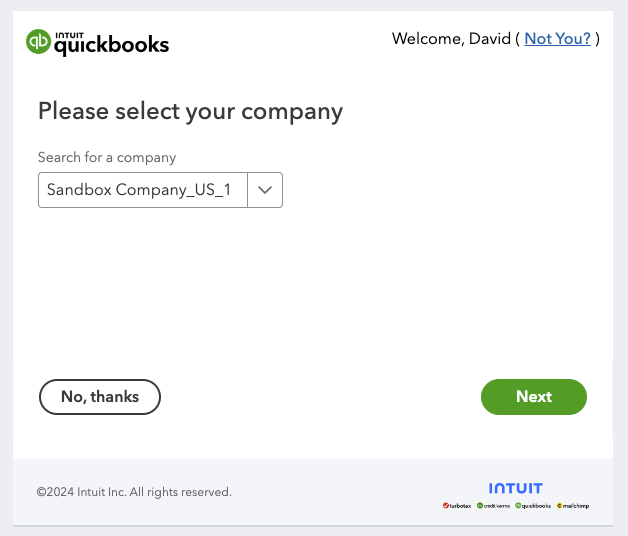
If you have multiple QuickBooks Online companies, select the correct company and click Next.
-
Click Connect to authorize the connection. You will return to the Integrations page.
-
Return to the integration page.
-
Set your TIC based on your research in Step 1. Search for the TIC that best fits your products or services. If there is no match, enter
0.
-
Click Save.
Step 5: Install and Authenticate the TaxCloud Browser Extension
The TaxCloud for QuickBooks Online browser extension gives you control when taxes are calculated on your invoices, sales receipts, and estimates. It is compatible with Google Chrome and Microsoft Edge. Other browsers that support Chrome extensions may also work.
Step 5a: Install the Extension
Get the TaxCloud for QuickBooks Online browser extension from the Chrome Web Store.
:::info Note: If you are using Microsoft Edge, you may need to allow extensions from other stores. :::
Step 5b: Generate an API Key and Find Your Connection ID
You will need this information to authenticate the browser extension.
-
In TaxCloud, go to Developer > API.
-
Click New API Key, give it a name (such as "QuickBooks Online Browser Extension"), and click Finish Setup.

-
Copy the new API key, you will need it in the next step.
-
Go to the Integrations page and find your QuickBooks Online connection ID.
-
Under TaxCloud API, copy the Connection ID.

Step 5c: Authenticate the Extension
-
In the browser where you installed the browser extension, open the TaxCloud app.
-
Open the TaxCloud for QuickBooks Online browser extension and click Authenticate.

-
Enter the Connection ID and API Key you copied in Step 5b.

-
Click Connect.
Step 6: Set Tax Codes for Your Products and Services
Use the TaxCloud Product Catalog to assign TICs to each product and service you sell. This ensures accurate tax calculations for every line item.
:::info See also: Setting Up Product Tax Codes (TICs) for QuickBooks Online :::
Step 7: Create a Test Invoice
Before going live, generate a test invoice to confirm TaxCloud is calculating taxes correctly.
-
Create a new invoice in QuickBooks Online.
-
Make sure the invoice has a valid Ship to address.
-
Make sure the invoice has a valid Ship from address.
-
Add your line items. Check the Tax box for any taxable items.
-
Set the tax rate to the TaxCloud 0% rate you created in Step 3.
-
Save the invoice.

-
Open the TaxCloud for QuickBooks Online browser extension and click Calculate Taxes.
TaxCloud calculates the taxes, updates the invoice, and refreshes the page to display the updated tax information.
:::info Note: By default, TaxCloud adds a new tax line item for each of the original line items on your QuickBooks invoice instead of just 1 total tax amount for the entire invoice. (This default behavior is due to a QuickBooks limitation.)
If you prefer a simplified presentation, you can enable Combined Tax Line Items display mode so that only a single aggregated "Total sales tax" line appears on the document. See Sales Tax Display Settings (QuickBooks Online) in your TaxCloud settings. :::
https://www.loom.com/share/88d217ff671b4ed0ac2ec58c34da844f
Step 8: Go Live
:::info Note: If you are a new TaxCloud customer working with our Onboarding Team, wait to go live until your agreed-upon contract start date/date agreed upon with your onboarding specialist. :::
Once you have confirmed that taxes are calculating correctly:
- In TaxCloud, go to the Integrations page.
- Click your QuickBooks Online connection.
- In the top-right corner, click Go Live, then confirm your choice.
After going live, all captured transactions are included in reporting and tax remittance.